
 Safety Glasses
 Gloves
 Ratchet Set
 Serpentine Belt
 Idler Pulley
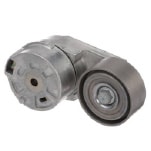 Tensioner
 Breaker Bar (optional)
Keep in mind before beginning your repair that the serpentine belt, tensioner, and idler pulleys were designed to work as a system. Since all these components have similar lifespans, manufacturers typically recommend replacing all of them at the same time so the system can perform its best. If you notice squeaking or squealing noises coming from the engine, belt misalignment, visible damage or belt wear, or an illuminated Check Engine light, you may need to replace your vehicle’s serpentine belt, tensioner, and idler pulley(s). If you’re experiencing severe belt wear symptoms or aren’t completely sure how to diagnose this yourself, we’d also be happy to recommend a professional technician in your area.

Step 1: Locate Your Serpentine Belt
Turn off your vehicle, lift the hood, and let the engine cool down.

The belt will be the first thing to come off and the last thing to go back on, so find the routing layout of your vehicle’s serpentine belt. Each model will be different – on our Jeep, we have a diagram of the belt routing on the radiator support, but you can usually find the layout in your owners manual or somewhere in the engine compartment. For easy reference, take a picture of the diagram so you’ll have it available.
|
Do It Right: In some cases, you may have to sketch the belt routing before removing the belt. Your diagram should indicate where the tensioner is located. |

Step 2: Remove the Old Belt
Use your ratchet and socket to rotate the belt tensioner in the opposite direction of its travel to relieve tension on the belt. Then, you should be able to slip the serpentine belt off one of the pulleys. If you need more leverage to relieve the belt’s tension, use a breaker bar in place of a ratchet.
|
Do It Right: If your vehicle has a manual tensioner rather than a spring-loaded automatic tensioner, you may need to tighten the bolt to keep it in place once tension is relieved. |

Once the serpentine belt is slipped off of the tensioner pulley, you can remove your ratchet from the tensioner. Now you can remove the belt completely.

Step 3: Remove the Old Belt Tensioner
To remove the tensioner, you’ll remove the bolt or bolts securing it. Be sure to keep those bolts in case your new tensioner doesn’t include them. Note the orientation of the old tensioner, as well as any locating pins or areas on the engine to ensure you can easily install your new tensioner.

Step 4: Install the New Belt Tensioner and Idler Pulley
Install your new belt tensioner by bolting it in place, ensuring that any alignment pins are properly placed. Then torque the bolt to the manufacturer’s specifications.
On our vehicle, the idler pulley is installed on the tensioner itself, but an idler pulley can be separate from the tensioner and is typically held in place by a single bolt. To remove most idler pulleys, simply remove the bolt in the center with your ratchet and socket.
|
Do It Right: Any time you install an idler pulley, be sure the bolt is torqued to the manufacturer's specifications. |

Step 5: Replace the Idler Pulley and Install a New Serpentine Belt
Make sure your pulleys are clean before installing your new serpentine belt. Inspect and clean all the accessory pulleys to ensure they are free from oil or grease. A greasy pulley will contaminate the belt as soon as you start your vehicle. Soap and water work great to clean and degrease the pulleys before installation of the new serpentine belt.

Step 6: Install the New Serpentine Belt
Use your routing diagram as a reference, and start routing your new serpentine belt from the bottom. Get the belt looped onto all but one pulley; this will typically be the tensioner pulley. You’ll need your ratchet to turn the belt tensioner enough to slacken the belt and get the belt around the last pulley.
|
Do It Right: Once the belt is in place, check it at each pulley to make sure it’s properly seated to avoid abnormal wear. Good belt-to-pulley contact is necessary for the belt to create the friction needed to transfer power to the accessories. |

Step 7: Inspect the New Serpentine Belt
Now you can remove your ratchet. Start up your engine, and take a look from a safe distance to make sure the serpentine belt is staying seated the way it should be with the vehicle running.

The automotive repair work depicted in this series is performed under the direction of the manufacturer of the product featured. Prior to undertaking any of the demonstrated repairs on your vehicle, we suggest you consult with a certified mechanic or another professional who can adequately advise you of the proper repair or remedy required. O’Reilly Automotive Stores, Inc. and its affiliates (“O’Reilly”) disclaims any responsibility for injury or damage resulting from a viewer’s attempt to recreate the repairs shown in this series.