How to Change the Tail Light on a Ford Escape

Your Ford Escape’s tail lights help let other drivers know that you are in front of them, and some tail light assemblies also include brake lights and turn signals to make other drivers aware of your car slowing down, stopping, or turning. Replacing failing tail light bulbs on your 2008 to 2011 Ford Escape is an easy repair that can help ensure you’re complying with state road laws and driving safely. It’s recommended that both tail light bulbs on your Ford Escape be replaced at the same time, since the bulbs have been used for the same amount of time and they are likely to fail with the same amount of use. Malfunctioning tail light bulbs can create issues with other drivers seeing your Ford Escape on the road, and could put you and others in danger. Our detailed step-by-step instructions will help you perform tail light bulb replacement on your 2008 to 2011 Ford Escape to help you stay safe on the road while avoiding a traffic ticket.

Ford Escape Tail Light Change Tools & Materials

Ford Escape Tail Light Change Tools & Materials

We will be changing the tail light in this 2008 Ford Escape, and the procedure will be similar in almost any Escape, but be sure to know the specifics for your vehicle before getting started. As we go, I’ll be pointing out minor differences you might see. If you’re not completely comfortable doing the job yourself, we’d be happy to recommend a professional technician in your area.
Step 1.1 Open the back hatch and locate the two screws for the assembly

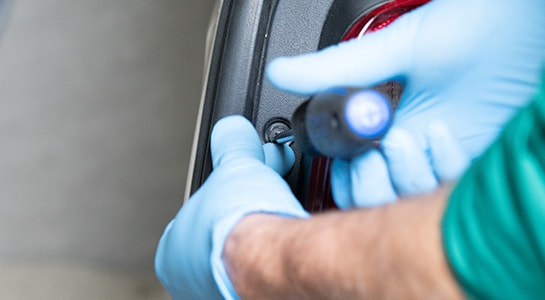
Step 1: Remove the Old Tail Light Bulb

Open the back hatch and locate the two screws that are securing the tail light assembly. If you’ve got a late model Escape, these will be 8mm bolts.
Step 1.2 Use your Phillips-head screwdriver or socket to remove the screws

Use your Phillips-head screwdriver or socket to remove these and set them aside someplace safe.
Step 1.3 Disengage the assembly while watching for the attached wires

Pull back on the assembly directly toward the rear of the vehicle to disengage it. On this model, each bulb is attached by a wire. The bulbs can be disconnected from these wires so that you can remove the assembly with the bulbs in it.
Step 1.4 remove the bulb that needs replacing bby urning it counterclockwise

Remove the bulb that needs replaced by turning it counterclockwise and pulling it carefully out of the assembly. If you’re changing the bulb on a late model Escape, just unplug the wiring harness from the assembly to detach it.
Pull gently on the bulb that needs to be replaced to remove it from its socket

Pull gently on the bulb that needs to be replaced to remove it from its socket.
Step 2.1 Press the  bulb into place in the socket and turn it clockwise to secure it in the assembly

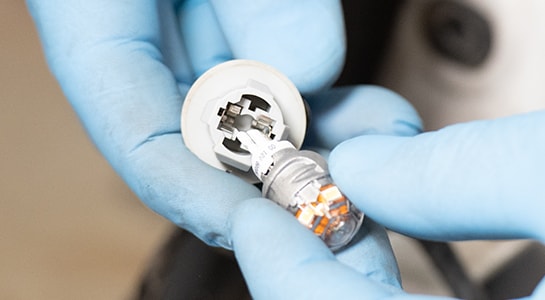
Step 2: Install the New Tail Light Bulb

Press the new bulb into place in the socket and turn it clockwise to secure it in the assembly.

Do It Right: Use a small amount of bulb grease or dielectric grease on the bulb connection to prevent socket corrosion and ease installation, especially if the bulb you’re installing could potentially get wet.

Reattach the wires for removing the assembly and slide it back into place

Reattach the wires you detached to remove the assembly and slide the assembly back into place.
Use your screwdriver or socket to secure the assembly

Use your screwdriver or socket to secure the assembly using the screws or bolts you removed previously. Close the back hatch.

Additional Resources

These step-by-step instructions and video detail how to replace the tail light bulbs on your 2008, 2009, 2010, and 2011 Ford Escape. The replacement procedures will be similar for select Ford Escape SEL models between 2009 and 2011. Replacing a faulty or failing tail light helps you abide by state road laws, and makes other drivers aware of your vehicle’s presence and intended direction. If you notice that your 2008 to 2011 Ford Escape's tail light bulbs are not working or only function sporadically, it is important to replace both bulbs as soon as possible to ensure you are safe on the road.

The automotive repair work depicted in this series is performed under the direction of the manufacturer of the product featured. Prior to undertaking any of the demonstrated repairs on your vehicle, we suggest you consult with a certified mechanic or another professional who can adequately advise you of the proper repair or remedy required. O’Reilly Automotive Stores, Inc. and its affiliates (“O’Reilly”) disclaims any responsibility for injury or damage resulting from a viewer’s attempt to recreate the repairs shown in this series.